DIY car maintenance covers safe checks and simple replacements that keep your car reliable, reduce costs and improve safety without touching complex systems. Essential DIY car maintenance helps ensure safety, prevent costly repairs, and extend your car’s lifespan. This guide follows the structure users expect, adds Australia specific tips, and shows exactly what to do at home and when to book a professional.
What You Can Safely Do at Home
You can safely check tyres, lights, wipers, simple fluid levels and filters without specialist tools or training. Key DIY tasks include checking fluid levels, inspecting tires, and replacing air filters and wiper blades. Start with tyre pressure and tread checks, exterior lights test and a windscreen wiper inspection. Use the dipstick for oil level, top up washer fluid and visually confirm the coolant overflow bottle sits between the marks. Check engine air and cabin filters for dust and debris. Stop and book a professional if you see fluid leaks, warning lights, overheating, uneven tyre wear or braking issues.

How To Check Tyre Pressures
Check tyre pressures at least every fortnight and before long trips to improve safety, tyre life and fuel efficiency. Find the correct tyre pressure on the placard inside the driver’s door, in the glove box or on the fuel flap. Always use a tyre pressure gauge when tyres are cool for an accurate reading.
- Remove the dust cap and press the gauge squarely on the valve.
- Compare the reading to the placard.
- Inflate or deflate to match, then recheck.
- Refit the dust cap and repeat on all tyres, including the spare.
Seasonal temperature swings change pressure, so recheck after significant weather changes.
How To Check Tyre Wear
Inspect tread depth and tyre condition to avoid unsafe driving and costly repairs. Australia’s legal minimum tread depth is 1.5 mm, but replacing earlier improves wet grip. All tyres have in built tread wear indicators inside the grooves; when tread approaches these markers, replace the tyre. Look for even wear across the tread. Inside edge wear suggests alignment issues. Cupping or feathering can indicate suspension problems. Bulges, cuts or sidewall cracks require replacement. If wear is uneven, book a wheel alignment and a suspension check.
How To Check Headlights, Tail Lights, Brake Lights and Indicators
Test all exterior lights regularly so you can see and be seen. Turn on headlights, high beam, indicators and hazards. Ask a helper to confirm brake lights or reverse near a wall to see reflections. Replace blown bulbs on older halogen systems by following the owner’s manual. For modern LED or matrix systems, book a qualified mechanic.
How To Check and Replace Windscreen Wiper Inserts
Replace wiper inserts when they smear, squeak or leave streaks so you maintain clear visibility. Lift each wiper arm, slide the old insert out of the blade and fit the new insert to the same length. Lower the blade gently to avoid cracking the glass. Replace wipers in pairs for even performance. If the blade assembly or arm is damaged, or your car uses integrated washer jets, book a professional to avoid misalignment.
How To Check and Refill the Windscreen Washer Bottle
Keep the washer reservoir topped up so you can clear grime and insects quickly. Locate the bottle under the bonnet, usually with a blue or yellow cap. Fill with water and a suitable automotive washer additive following the instructions. Do not use dishwashing liquid, which can damage wiper rubbers and leave residue. If jets are blocked, gently clear with a pin unless your car uses arm embedded nozzles that require workshop adjustment.
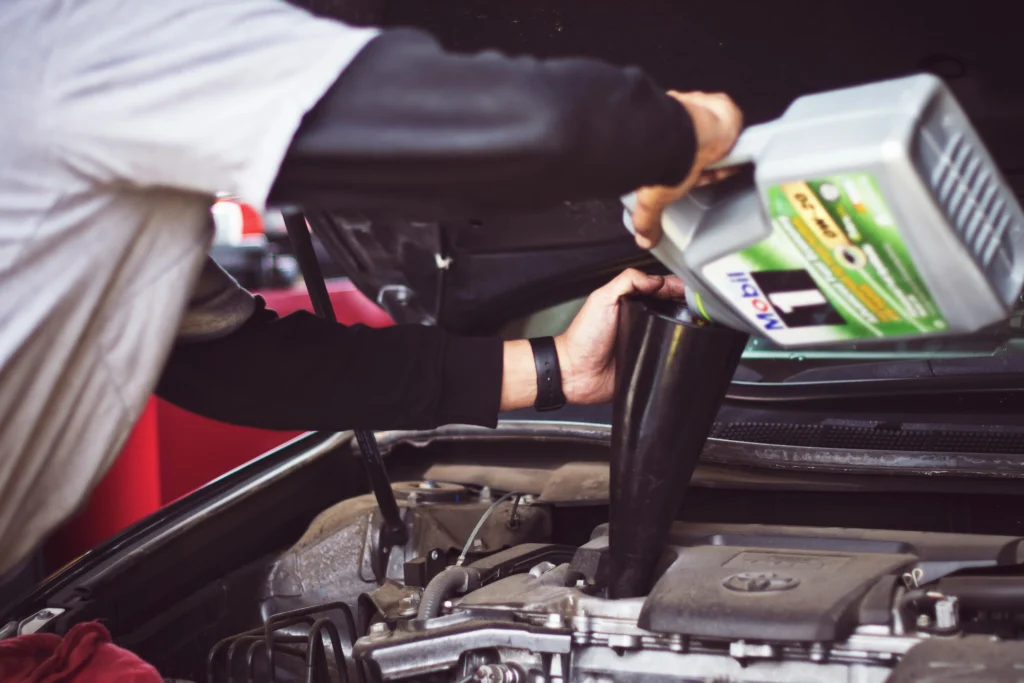
How To Check the Engine Oil Level
Use the dipstick for an accurate engine oil level reading and top up only if it is below the mark. For an accurate reading, check after the engine has been running for a few minutes and then switched off on level ground. Pull the dipstick, wipe with a clean rag, reinsert fully, then check the level near the full mark. If you need a top up, use the oil grade specified in the owner’s manual, remove the oil filler cap and add a small amount through a funnel. Recheck to avoid overfilling. If your car uses a digital dipstick in the infotainment screen, follow the on-screen procedure. If a low oil or oil pressure warning remains, book a workshop visit immediately.
How To Check Other Fluid Levels Safely
Limit DIY to visual checks on reservoirs designed to be seen without opening pressure systems. Specific fluid reservoirs in the engine bay typically have ‘MIN’ and ‘MAX’ lines. Most reservoirs have clear MIN and MAX marks; keep levels between these and book a mechanic if levels drop or look contaminated. Confirm the coolant overflow bottle sits between the marks. Check brake fluid level through the clear reservoir. Leave transmission fluid, power steering hydraulics, coolant cap removal and fuel system work to qualified mechanics. Opening pressurised or sealed systems can cause injury and expensive damage.
Checking Other Areas of the Car
Scan for simple signs that prevent small issues becoming serious damage. It’s important to walk around the vehicle when it’s parked, looking for signs of wear and tear or damage to the car’s body. With the engine cold, squeeze visible rubber hoses for soft spots or splits. Look for corrosion or build up on battery terminals. Walk around the car to spot loose trim, cracked lenses and stone chips. Clean the windscreen with automotive glass cleaner to protect wiper rubbers and camera based safety systems. If anything looks questionable, seek professional help.
Tools You Actually Need
A small set of tools covers the most common DIY checks and replacements. Consulting the owner’s manual is important for specific instructions and maintenance schedules. Keep a tyre pressure gauge, a portable air pump, a torque wrench for wheel nuts, a funnel, nitrile gloves, a clean rag, quality wiper inserts and your owner’s manual. Use jack stands if you raise the vehicle and always work on level ground with wheels chocked.
Quick Maintenance Schedule for Australian Conditions
Follow a simple schedule that suits Australian heat, UV and coastal air. Hot summers and sea spray shorten rubber and wiper life, while dust from regional trips clogs filters faster.
| Task | Frequency | Time | Tools | Notes |
| Check tyre pressure and tread | Fortnightly and before trips | 10 minutes | Tyre pressure gauge, air pump | Use placard pressures on driver’s door |
| Test exterior lights and indicators | Monthly | 5 minutes | None | Use a wall reflection or helper |
| Inspect wipers and replace inserts | Every 6 months or if streaking | 10 minutes | Wiper inserts | Replace in pairs |
| Check oil level with dipstick | Monthly | 5 minutes | Clean rag, funnel | Top up only if below mark |
| Top up washer fluid | Monthly | 5 minutes | Washer additive | Do not use dishwashing liquid |
| Visual check coolant overflow, brake fluid level | Monthly | 5 minutes | None | If low or dirty, book a service |
| Check air and cabin filters | Every 6 months | 10 minutes | Screwdriver, manual | Replace if dirty or damp |
| Battery voltage check | Every 6 months and monthly visual check | 10 minutes | Multimeter | Healthy resting voltage ~12.6 v |
Step By Step: Replace Wiper Blades
Replacing wiper inserts is a quick DIY job that restores clear vision in minutes. Replacing wiper blades is one of the easiest car maintenance tasks, ensuring you can see clearly in all weather conditions.
Tools and supplies: new wiper inserts matched to your model, clean rag.
- Park on level ground and switch off the ignition.
- Lift the wiper arm gently away from the windscreen.
- Press the retaining clip and slide the old blade insert out of the backing.
- Match the new insert length to the old one and slide it into the rails until it locks.
- Lower the wiper arm carefully onto the glass.
- Repeat on the other side and test with washer fluid.
If the blade assembly is bent or the arm is loose, book a professional to prevent screen damage.
Step By Step: Replace The Engine Air Filter
A clean engine air filter supports performance and fuel economy and is usually simple to replace.
Tools and supplies: replacement filter for your model, basic screwdriver if required.
- Open the air filter housing using the clips or screws shown in the owner’s manual.
- Lift out the old filter and note its orientation.
- Wipe any loose dust from the housing with a clean rag.
- Fit the new filter in the same orientation so the seal sits evenly.
- Close and fasten the housing securely.
Stop if fittings are brittle or you see oil in the air box, then book a mechanic for inspection.
Battery Checks at Home
Basic battery checks help you spot early failure without removing components. Batteries typically last three to five years and should be inspected for corrosion and secure connections. Do a quick monthly visual check for corrosion and loose clamps and book regular battery testing to prevent breakdowns. A healthy resting voltage is around 12.6 V. If starting is slow, lights dim at idle or voltage is low after charging, seek a professional load test. Some modern cars need battery registration after replacement, so leave replacements to a workshop.
When To Stop DIY And Book A Service
Stop DIY and book a professional if safety, warranty or specialised tools are involved. Regular battery testing can prevent breakdowns and ensure your car starts reliably every time. Book a workshop when brake pad thickness looks near 3 mm, tyres wear unevenly, fluids drop quickly, the engine overheats, warning lights stay on or the car cranks slowly. Leave oil changes on European makes, transmission fluid, power steering hydraulics, coolant cap removal, fuel system work and lighting modules on LED systems to qualified technicians.

Frequently Asked Questions
How Often Should I Check Tyre Pressure in Australia?
Check tyre pressure at least every fortnight and before long trips for safe handling and better fuel economy. Use a quality gauge on cool tyres and follow the placard in the driver’s door. Recheck after seasonal temperature changes because pressure drops as temperatures fall.
What Fluids Can I Safely Top Up at Home?
Top up washer fluid and engine oil only when the dipstick shows low and confirm the coolant overflow bottle is between the marks. If brake fluid, coolant or power steering fluid is low or discoloured, book professional help because leaks or contamination can damage critical systems.
When Should I Replace Windscreen Wiper Blades?
Replace wiper inserts every six months or sooner if they squeak, smear or skip. Harsh sun and coastal air in Australia shorten rubber life, so check more often in summer or after beach trips. Replace inserts in pairs to keep sweep pressure even across the windscreen.
How Do I Know If My Air Filter Needs Replacing?
Replace the engine air filter when the pleats look dark, dusty or damp, or if your service interval is due. A clogged filter can reduce performance and economy. Most housings use clips for quick access but stop if fittings look brittle and book a mechanic.
What Voltage Should a Healthy Car Battery Read?
A healthy fully charged battery reads about 12.6 V at rest and over 13.7 V with the engine running as the alternator charges. If voltage sits low after charging or the engine cranks slowly, arrange a load test. Some cars need battery registration after replacement.
What DIY Tasks Could Affect My Warranty?
DIY that opens sealed or pressurised systems can affect warranty, so leave brakes, transmission fluid, coolant caps and fuel systems to a workshop. Stick to checks and simple replacements like wiper inserts and air filters and always follow the owner’s manual.
Conclusion
DIY car maintenance covers safe checks and simple replacements that keep your car running smoothly while avoiding expensive repairs. Check tyres fortnightly, test lights, replace wiper inserts, confirm oil level with the dipstick, top up washer fluid and visually check coolant and brake fluid reservoirs. Stop and book a professional when you see leaks, warnings, uneven wear or anything that needs specialist tools.
Call and book a safety inspection today to catch issues early, protect your warranty and drive with confidence.
SERVICE QUOTE
24 Radius Loop, Bayswater WA 6053
Monday – Friday: 8am – 5pm
Saturday: 9am – 1pm
(Appointments Only)
Our Services
Brake Servicing
- Brake Inspection & Diagnosis
- Disc Brake Service
- Drum Brake Service
- Master Cylinder
- ABS Diagnosis
- Brake Fluid Flush
Car Electrical Services
- All lighting and modifications
- Control module diagnosis
- Alternators, Batteries
- Starters
- Air Bag System Diagnosis and repair
- Accessories and upgrades
- Windshield Wipers & Washers
Collision Advice
- Insurance Claims
- Vehicle Restoration
- Body Kits
- Glass Replacement
- Custom Graphics
- Interior & Exterior Trim
- All Makes and Models
Comfort System
- Air Conditioning Service
- System Diagnosis
- Heater Core
- A/C Compressors
- Blower Motors
- Climate Control System
Cooling System
- Leak Diagnosis
- Overheating Diagnosis
- Water Pumps
- Radiators
- Cooling Fans
- Coolant Hoses
- Thermostats
Engine Performance
- High Performance Upgrades
- Drivability Diagnosis
- Fuel Injection Service
- Computer System Diagnosis
- Maintenance Tune-Up
- Emission Diagnosis & Repair
- “Check Engine” Light Diagnosis
Engine Servicing
- Oil Leak Diagnosis
- Timing Belts
- Performance manifolds and accessories
- Head Gaskets
- Engine Replacement
- Engine Service
- Exhaust System Replacement & Repair
- Performance Upgrades
Maintenance Services
- Factory protected log book servicing
- Full 100 safety point inspections
- Transmission Service
- Cooling System Flush
- Tyre Rotation & Balance
Pop and Crackle Tunes (Burble Tunes)
- Stage 1 Tuning
- Stage 2 Tuning
- Stage 3 Tuning
- Fuel Efficiency Tuning
- Engine Remapping
Steering & Suspension Servicing
- Two & Four Wheel Alignments
- Struts & Shocks upgrades or replace
- Rack & Pinion diagnosis and repair
- High Performance Suspension
- Upgrades & Adjustments
- Tyre Replacement
- Transmission diagnosis & Repair
- Differential Replacement
- Complete Drive Train Repair